http://doc.qt.digia.com/4.7-snapshot/multimedia-audiooutput.html
Nevertheless, the example tries to cover all the cases, which makes hard to sort through what you really need. The simpler example that I finally followed was this:
http://www.qtforum.org/article/36606/solved-qaudiooutput-truncated-sinusoid-sound.html
After chewing on this, I created a different example (see below). The code works, but I am not an expert at all, my interpretation may be wrong and I am short in time to use any kind of error handling, close memory properly, etc... so, take it with a grain of salt :). Comments are very welcome :). The other thing is that the code does not solve the "real time" aspect of things... For instance, an explosion going off in a game and listening to it right then. I'll have to work on this...
1. The object representing the physical device:
You will need an object for the audio device itself, representing the physical element on the machine. That is the QAudioOutput object. The information of that device will be under a QAudioDeviceInfo object. If you go with the default, you don't even need to see what that info is (QAudioDeviceInfo::defaultOutputDevice).
This object has an internal buffer, which size is set by setbuffersize. You got to give it a number and I found out that the bigger the better was working. I think that had to do with overrun (see below).
2. The object to interface/pass data to the physical object in #1
To pass the data to that device, you need to connect the physical object to a QIODevice object. You do that by using QIODevice = QAudioOutput->start();
3. Getting the data to that "interface" object
Once you connected your interface object to the physical one, all what you need is to keep feeding data to the QIODevice. You do so using "write" (QIODevice::write). Every time you write there, it just appends that data to whatever you had written before. QAudioOutput reads from that buffer automatically (we don't see it).
The key is then to keep feeding data. Don't let the buffer empty and don't put too much/overrun the buffer (remember the size you set with setbuffersize). That is explained here:
http://lists.qt.nokia.com/pipermail/qt-interest/2010-June/024858.html
Basically, we don't know when exactly the audio is going to play it (I guess when the CPU or DMA or whatever gets to it...), but we don't care, we just need to make sure that there is always data to be played and to not exceed the buffer depth. I guess that there are several strategies here, but one can ask the device object to give us a notification every certain time. No timer needed, just use audioOutput->setNotifyInterval(50); where the 50 means 50ms (lot's of people use that). So, every 50ms, a signal will be generated and then we just connect that to a slot, to check if more data is needed and feed it if so:
QObject::connect(QAudioOutput, SIGNAL(notify()), this, SLOT(writeMoreData()));
So, every 50ms there will be a call to writeMoreData. What you do in there is up to you, but basically that's where you do the QIODevice::write to fill the buffer up. Just remember that you need to keep feeding "coherent" audio, so, you'll have to keep track on where you are in the audio you are sending. For instance, if a tone, you need to make sure that every time you come back to the writeMoreData, you feel the natural continuation of where you left it before.
But how do you know how many bytes you have empty in the audio buffer? Just use QAudioOutput::bytesFree.
There is one more thing... It is recommended that you write into the QIODevice in "chunks" of periodSize, which can be obtained with: QAudioOtuput::periodSize().
A final remark. Notice that your data may be, for instance, 16bits/sample (you set that when you create the QAudioOutput object, by passing a format), but a lot of the info returned by these functions is counted in bytes. So, take that into account...
Example
With that in mind, let's have a look to my code, which generates every second a tone of 4KHz during 100ms (no audio between tones).
My_Widget.h:
 /*
  * My_Widget.h
  *
  * Created on: Oct 7, 2012
  *   Author: a0214929 / Eduardo Bartolome
  */
 /*
  * audioOutput is the physical object. It gets the data
  * from the auIObuffer automatically, once they are connected.
  * But we need to refill the auIObuffer from outside.
  * In this case, as we may have async audio pieces (created
  * from the game event, like key presses, explosions...)
  * we have a big circular buffer (aubuffer) that stores
  * those as they get in, and it's read out by the auIObuffer
  * when a notify comes.
  *
  * The aubuffer is an array of 44100 2 byte elements *
  */
 #ifndef MY_WIDGET_H_
 #define MY_WIDGET_H_
  #include <QtCore/QObject>
  #include <QtGui>
  #include <QObject>
  #include <QIODevice>
  #include <QAudioOutput>
 const float DurationSeconds = 0.1;
 const int ToneFrequencyHz = 4000;
 const int DataFrequencyHz = 44100;
 const int BufferSize   = 44100; // Size of aubuffer, 1s long
 class My_Widget:public QWidget
 {
      Q_OBJECT
 public:
      My_Widget( QWidget * parent = 0,Qt::WindowFlags f = 0):QWidget(parent,f)
      {
           initializeWindow();
           initializeAudio();
           writeMoreData();
      }
      ~My_Widget()
      {
           delete audioOutput;
      }
 public slots:
      void writeMoreData();
 private:
      void initializeWindow();      // This creates the GUI
   void initializeAudio();
      // For the GUI
      QTextEdit string_display;
      QPushButton quitButton;
      QGridLayout layout;
      // For the audio
      QAudioDeviceInfo deviceinfo;     // The information on the audio device
      QAudioOutput*  audioOutput;      // Object that takes the data from the IO device
                                              // when needed and sends to audio device.
      QAudioFormat   format;
      QIODevice*            auIObuffer;     // IODevice to connect to m_AudioOutput
      signed short   aubuffer[BufferSize];     // Audio circular buffer
      int                      readpointer;           // Pointer to the portion of the audio buffer
                                                   // to be read.
      int                      writepointer;           // Pointer to the portion of the audio buffer
                                                // to be written.
 };
 #endif /* MY_WIDGET_H_ */
My_Widget.cpp:
 /*
  * My_Widget.cpp
  *
  * Created on: Oct 7, 2012
  *   Author: a0214929
  */
 #include "My_Widget.h"
 #include <qmath.h>
 #include <qEndian.h>
 void My_Widget::initializeWindow()
      {
        string_display.setReadOnly(true); // Displays all what user typed
           string_display.setAcceptRichText(true);
           quitButton.setText("Close");
           // The order of creation sets the order of focus with tab
           layout.addWidget(&string_display,0,0);
           layout.addWidget(&quitButton,1,0,1,2);
           this->setLayout(&layout);
           this->setFocus(); // This has to be after creation.
                                // AND without this, the tab and space
                    // keys will just move focus within the widget
           QObject::connect(&quitButton, SIGNAL(clicked()), qApp, SLOT(quit()));
      }
 void My_Widget::initializeAudio()
 {
   deviceinfo=QAudioDeviceInfo::defaultOutputDevice(); // Device info = default
   audioOutput=0;
   // qthelp://com.trolltech.qt.482/qdoc/qaudioformat.html
   format.setFrequency(DataFrequencyHz);
   format.setChannels(1);          // The number of audio channels (typically one for mono
                                            // or two for stereo)
   format.setSampleSize(16);      // How much data is stored in each sample (per channel)
                                             // (typically 8 or 16 bits)
   format.setCodec("audio/pcm");
   format.setByteOrder(QAudioFormat::LittleEndian);
   format.setSampleType(QAudioFormat::SignedInt);
   // Constructor of QAudioDeviceInfo that gets the one from the default device
   QAudioDeviceInfo info(QAudioDeviceInfo::defaultOutputDevice());
   if (!info.isFormatSupported(format)) {
     qWarning() << "Default format not supported - trying to use nearest";
     format = info.nearestFormat(format);
   }
   audioOutput = new QAudioOutput(deviceinfo, format, this);
      audioOutput->setNotifyInterval(50);
      audioOutput->setBufferSize(131072); //in bytes
   QObject::connect(audioOutput, SIGNAL(notify()), this, SLOT(writeMoreData()));
   //auIObuffer->open(QIODevice::ReadOnly);
      auIObuffer = audioOutput->start();
   // We will delete this later, but for the moment we store a 0.1s tone on the aubuffer
   // As the buffer is 1 second long, the buffer tone will be played periodically every 1s,
   // after the buffer wraps around.
   for (int sample=0; sample<BufferSize; sample++) {
        signed short value=0;
        if ((sample>20000) && (sample<20000+(DurationSeconds*DataFrequencyHz))){
          float time = (float) sample/DataFrequencyHz ;
          float x = qSin(2 * M_PI *ToneFrequencyHz* time);
          value = static_cast<signed short>(x * 32767);
        }
        aubuffer[sample] = value;
   }
   string_display.insertPlainText(QString::number(aubuffer[1]));
   string_display.insertPlainText(" ");
   string_display.insertPlainText(QString::number(aubuffer[20000]));
   string_display.insertPlainText(" ");
   string_display.insertPlainText(QString::number(aubuffer[20001]));
   string_display.insertPlainText(" ");
   string_display.insertPlainText(QString::number(aubuffer[24409]));
   string_display.insertPlainText(" ");
   string_display.insertPlainText(QString::number(aubuffer[40000]));
   string_display.insertPlainText(" ");
   writepointer=0;
   readpointer=0;
 }
 // When the audio calls for this routine, we are not sure how much do we need to write in.
 // We need to make sure that what we send is n-sync with what is in the buffer already...
 void My_Widget::writeMoreData()
 {
      int emptyBytes = audioOutput->bytesFree(); // Check how many empty bytes are in the device buffer
      int periodSize = audioOutput->periodSize(); // Check the ideal chunk size, in bytes
      string_display.insertPlainText(QString::number(emptyBytes));
      string_display.insertPlainText(" ");
      string_display.insertPlainText(QString::number(periodSize));
      string_display.insertPlainText(" ");
      int chunks = emptyBytes/periodSize;
      while (chunks){
           if (readpointer+periodSize/2<=BufferSize)
           // The data we need does not wrap the buffer
           {
                auIObuffer->write((const char*) &aubuffer[readpointer], periodSize);
                readpointer+=periodSize/2;
                if (readpointer>BufferSize-1) readpointer=0;
                string_display.insertPlainText("<");
                }
           else
           // Part of the data is before and part after the buffer wrapping
           {
                signed short int_buffer[periodSize/2];
                // We want to make a single write of periodSize but
                // data is broken in two pieces...
                for (int sample=0;sample<BufferSize-readpointer;sample++)
                     int_buffer[sample]=aubuffer[readpointer+sample];
                     for (int sample=0;sample<readpointer+periodSize/2-BufferSize;sample++)
                          int_buffer[BufferSize-readpointer+sample]=aubuffer[sample];
                          auIObuffer->write((const char*) &int_buffer, periodSize);
                          readpointer+=periodSize/2-BufferSize;
                          string_display.insertPlainText(">");
                     }
           string_display.insertPlainText(QString::number(chunks));
           string_display.insertPlainText(" ");
           --chunks;
      }
 }
And the main.cpp:
 #include <QtGui>
 #include "My_Widget.h"
 int main(int argc, char *argv[])
 {
      QApplication a(argc, argv);
      My_Widget window;
   window.show();
        return a.exec();
 }
This is what would be displayed in my case:
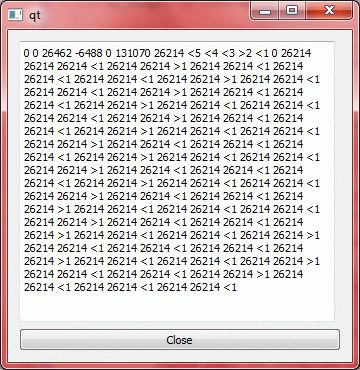
The first 5 numbers are the value in the circular buffer, just to make sure that things are what they need to be (blank, sine, blank).
"<" indicates that the chunk sent was before the end of buffer (wrap)
">" indicates that the chunk came part from before and part after the wrap.
The first number after < or > indicates the chunk number sent. Chunks are groups of periodSize long data. As we said, audio "likes" this.
The 2nd number shows the number of empty BYTES in the audio buffer when audio call the notification.
The 3rd number is telling us the periodsize, the number of BYTES. Do not confuse that with any kind of period in our buffer, ie., it is not the period of the sine we are sending or the wrapping period,
but just an internal number of the device audio buffer. We can see here is always constant at 26214.
So, now we can interpret the numbers. Initially (after the first five numbers) . One can see that we got 131070 BYTES free in the buffer. Notice that is almost what we set here: audioOutput->setBufferSize(131072);
As every audio sample is 2 bytes, that is 65535 audio samples long. We send a chunk of 26214 (13107 samples) from the beginning of our circular buffer (aubuffer, which is 44100 samples long), decrease counter to 4 and do that again. For 5 times.
Notice that as our circular buffer is 44100 long, we can do 3 reads of 13107 length before hitting the end of the buffer. I.e., 3 "<" hits and then one wrapping around the buffer, ie., ">". Then one more
from close to the beginning ("<") and the audio buffer will be full. Readpointer will be at 21435. (*)
Notice that in the first notification after that, the emptyBytes was zero (while period size was still 26214). But on the next notification (50ms) later, it seems to be the same as the periodSize. And it'll be like that from there on, with notifications coming fast enough that there is only one chunk per notification.
To continue with the analysis after where we left it at (*), one more read "<" and we are at 34532. Next one will hit the end of the buffer again, so, it'll be ">". And so on...
CHEERS!!!
PS1.: There is one more thing, called push vs pull mode, which refers, from the audio device perspective, how the data is obtained. I believe the above is "push" mode. Basically, we check how the buffer is doing and then write on it. The "checking" is triggered by the audio notify, but that is just like a timer, which I think is what the official Qt example shows (QTimer). Anyhow, I'll try to make a post on this as there is still some stuff I don't fully understand.
PS2.: By the way, to insert the code in blogger, I used the instructions here:
http://codeformatter.blogspot.com/
Also, I found this, but I didn't use it:
http://www.craftyfella.com/2010/01/syntax-highlighting-with-blogger-engine.html


